Een rustige, praktische gids over wat dot painting is, wat er in je kit zit, hoe je begint en hoe je je eerste ontwerp kiest.
Kort antwoord
Dot painting is een creatief kunstpakket. Je canvas is bedrukt met kleine, lichte cirkels die je met de hand invult in één kleur naar keuze. Van dichtbij zie je losse stippen. Op normale kijkafstand vloeien ze samen tot een afgewerkt beeld.
Elke Paint By Dots canvas is bedrukt met kleine, lichte cirkels. Geen kleurcode om te ontcijferen en niets te mengen. Je kiest één stiftkleur en vult elke cirkel met een rustige druk. Het hele werk ontstaat in die ene kleur, cirkel na cirkel, tot het beeld uit het stippenpatroon tevoorschijn komt. Op normale afstand wordt het een afgewerkt beeld.
Kies één kleur
Elke kit wordt in één stiftkleur gemaakt. Kies degene die je mooi vindt.
Klassiek zwart
Diepblauw
Zacht goud
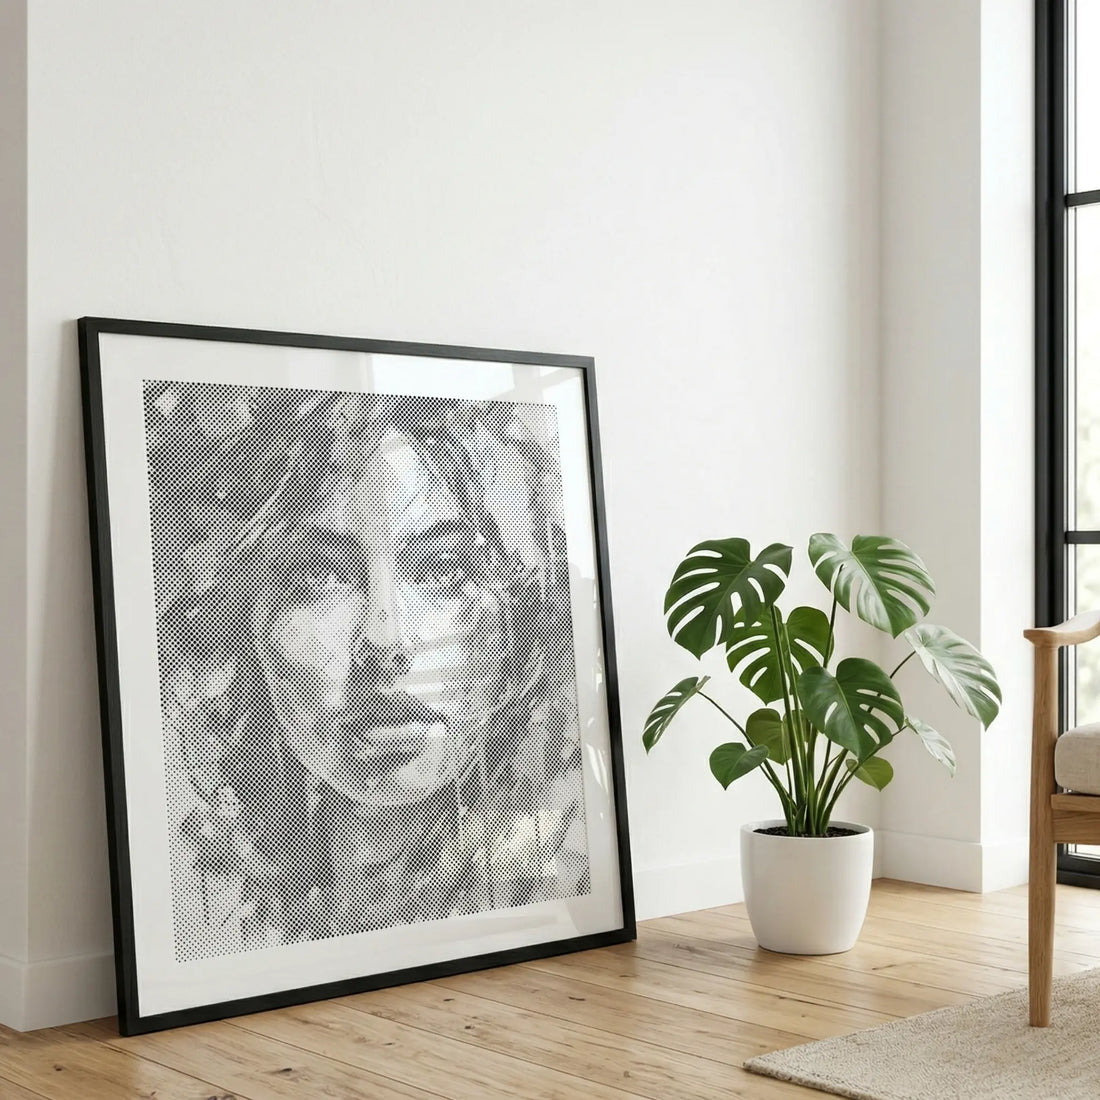
Van dichtbij: losse stippen
Van dichtbijOp afstand
Van dichtbij een veld van stippen. Stap terug en het beeld verschijnt.
Hoe het werkt
Drie rustige stappen
Het hele proces bestaat uit drie eenvoudige, terugkerende stappen.
01
Kies je kleur
Elke kit wordt in één stiftkleur gemaakt. Kies klassiek zwart, diepblauw of zacht goud.
02
Vul elke gedrukte cirkel
Werk cirkel voor cirkel, met één rustige druk per keer. Geen tekenen en geen keuzes.
03
Zie het beeld verschijnen
Naarmate de stippen zich opbouwen, komt het beeld langzaam uit het patroon tevoorschijn.
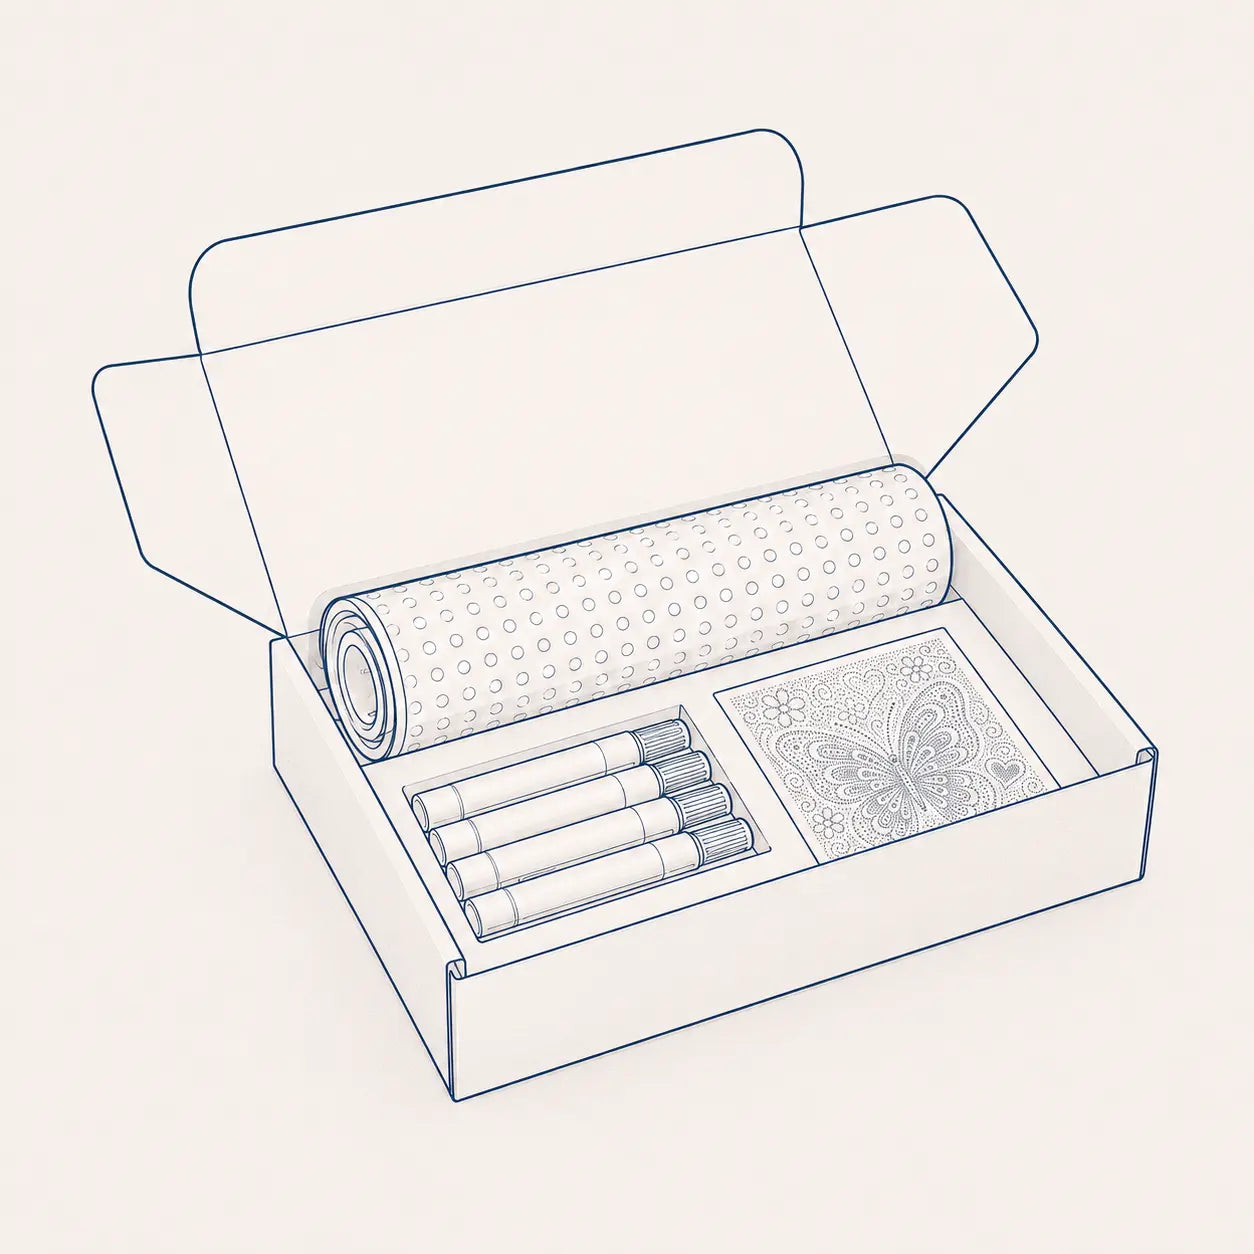
Wat er in je kit zit
Alles, in één doos
Elk onderdeel staat op de doos. Niets bij te kopen, niets voor te bereiden.
1Voorbedrukt canvasLichte, duidelijke cirkels2Dot-stiftenDik 1,0 mm + fijn 0,5 mm3Gedrukte previewJe afgewerkte referentie4Scan om te beginnenQR opent de instructies
Alles wat nodig is, zit erbij. Geen extra materiaal nodig.
Voordat je begint
Maak een rustige, comfortabele plek klaar
Een paar rustige minuten voorbereiding maken de hele sessie makkelijker. Niets is verplicht. Het helpt de stippen gewoon netjes neer te zetten.
Goed licht eerst
Beginners hebben het lastigst als ze de lichte cirkels niet goed zien. Ga bij daglicht bij een raam zitten, of zet een zachte, gelijkmatige lamp bij. Goed licht maakt elke cirkel makkelijk te volgen.
Vlakke ondergrond
Leg het canvas op een schone, vlakke tafel zodat het helemaal plat ligt.
Comfortabele stoel
Ga zo zitten dat je hand ontspannen op het canvas rust.
Dertig rustige minuten
Neem een rustig half uur voor je eerste sessie. Er is geen haast.
Preview binnen handbereik
Houd de gedrukte preview naast je om elk vlak te leiden.
Test op kladpapier
Zet eerst een paar stippen op papier om de inkt te voelen.
Iets te drinken, geen haast
Kom tot rust. Dit hoort een traag, rustgevend uur te zijn.
Je eerste tien minuten
Hoe de eerste tien minuten voelen
Het begin is altijd het traagst, en dat is heel normaal. Binnen een paar minuten vindt je hand het ritme en voelt het werk rustig en natuurlijk.
Een rustig half uur
0min
Kies een klein vlak
Kies een hoek of een klein vlak van één kleur. Klein beginnen houdt het makkelijk.
2min
Zet je eerste stippen
Pak je stift en vul een paar cirkels om de inkt te voelen.
5min
Bouw een ritme op
Je gaat van cirkel naar cirkel zonder na te denken. Het tempo zakt in.
10min
Het voelt natuurlijk
De beweging is nu vertrouwd. Velen merken dat hier de rustige focus begint.
De belangrijkste tip
Stem de punt af op de cirkel
Als je één ding onthoudt, dan dit. Kies hieronder een punt en kijk wat er gebeurt.
Grote cirkelStrak, gelijkmatigNiet helemaal gevuld
Kleine cirkelInkt loopt uitStrak, gelijkmatig
Eén bewuste druk, met de juiste punt, is beter dan steeds bijwerken.
Fouten en oplossingen
Veelgestelde vragen, eenvoudige oplossingen
Niets hiervan betekent dat je iets fout deed. Dit zijn de kleine, normale momenten van elke beginner, met voor elk een rustige oplossing.
De inkt oogt ongelijk
Laat de stip drogen en druk dan nog één keer zacht. Bij het drogen wordt de dekking meestal egaal.
De stift lijkt droog
Druk de punt een paar keer op kladpapier om de inkt weer te laten vloeien voor je verdergaat.
Een stip viel buiten een cirkel
Veeg het snel weg met een vochtig wattenstaafje voor het droogt, laat het drogen en ga door. Kleine sporen verdwijnen in het eindbeeld.
Mijn hand raakte natte inkt
Laat het drogen in plaats van te wrijven. De meeste sporen gaan er na het drogen netjes af.
Ik voel me te traag
Traag is juist de bedoeling. Er is geen juist tempo en je ritme groeit vanzelf met elke cirkel.
Ik zie de cirkels niet
Ga dichter bij daglicht zitten of zet een zachte lamp bij. Goed licht maakt elke cirkel makkelijk te volgen.
Je eerste ontwerp kiezen
Hoe je je eerste ontwerp kiest
Elk ontwerp kan, maar sommige zijn vriendelijker voor een eerste poging. Als regel zijn grotere kleurvlakken makkelijker dan fijne, drukke details.
Een prima eerste keuze
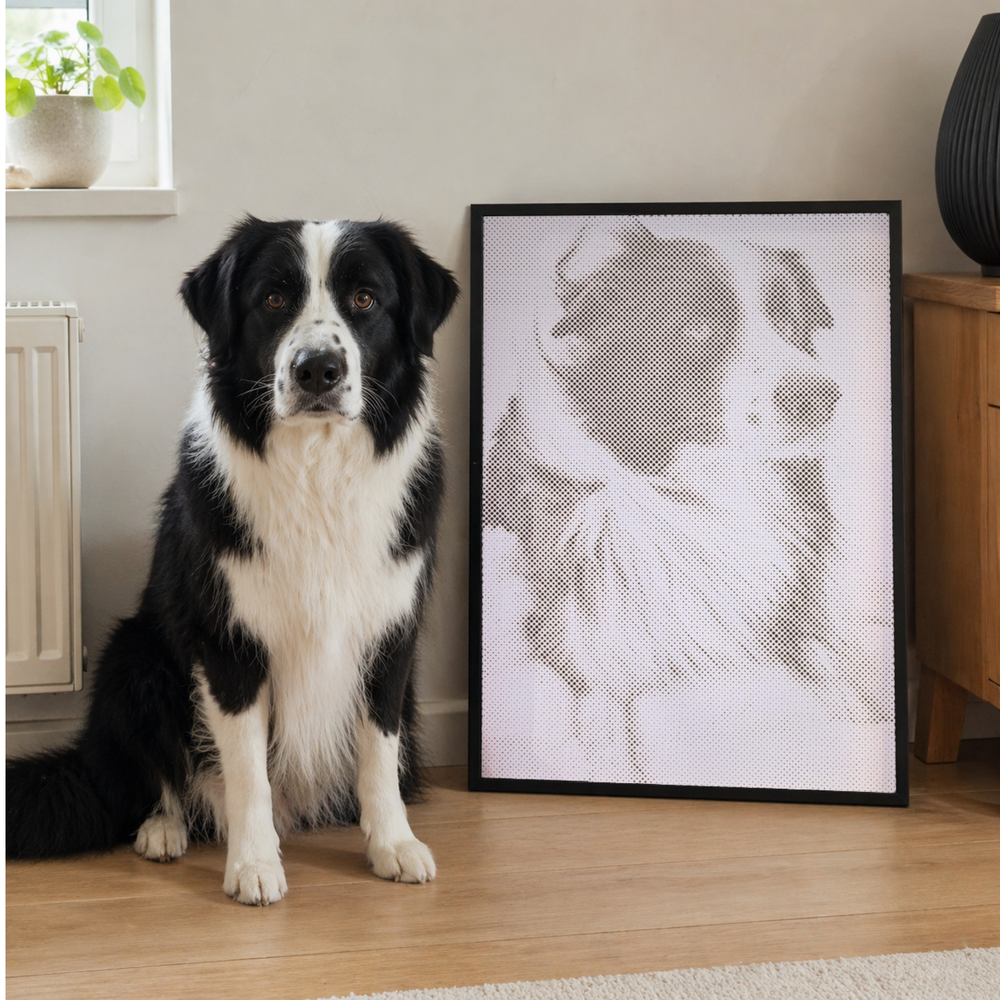
Dieren
Grote, vriendelijke vormen en grote kleurvlakken. Een rustig, dankbaar begin.
Dit zijn typische schattingen, geen beloftes. De tijd hangt af van het formaat en de hoeveelheid detail.
Kleine kit, ongeveer 30 x 40 cm
Meestal twee tot vier uur, vaak verspreid over een avond of twee.
Middelgrote of grotere kit
Meestal drie tot zes uur of meer, afhankelijk van het ontwerp.
Eigen, gedetailleerde ontwerpen
De tijd hangt af van formaat en detail. Gedetailleerde werken belonen een rustig tempo.
Er is geen juist tempo. Veel mensen verdelen het werk graag over meerdere rustige avonden.
Het eindresultaat
Hoe het afgewerkte schilderij eruitziet
De stippen geven het oppervlak een zachte, handgemaakte textuur die je ziet en voelt. Het oogt anders dan een vlakke print, warmer en persoonlijker, omdat jij het maakte. Het is gemaakt om te tonen.
Upload een foto die iets voor je betekent. We bekijken elk beeld met de hand en zetten het om in een dot painting canvas, klaar om in te vullen. Daarna vul je het met de hand in, stip voor stip. Zo wordt het persoonlijk zoals een print nooit kan, omdat je rustige uren met het beeld doorbrengt.
Een huisdier
Een familieportret
Een trouwfoto
Een bijzondere plek
Een dierbare herinnering
Dit is geen filter. Het is een dot painting in studiostijl, waarbij het proces deel is van het cadeau. Je maakt het kunstwerk zelf, stip voor stip.
Alles is zo gemaakt dat een eerste sessie makkelijk en ontspannen voelt, van het bedrukte canvas tot de stift in je hand.
Duidelijke begeleiding
Eenvoudige, rustige stappen die bij nul beginnen.
Een premium kit-ervaring
Doordachte materialen die bijzonder voelen, niet massaal gemaakt.
Dot-stiften
Twee punten voor grote en fijne cirkels.
Fotocontrole voor eigen kits
Elke eigen foto wordt met de hand gecontroleerd voor het drukken.
Europese focus
Gemaakt en verzonden met Europese klanten in gedachten.
Rustige support
Vriendelijke, geduldige hulp wanneer je die nodig hebt.
Gemaakt om te tonen
Afgewerkt als wandkunst die je wilt houden.
Vergelijk de hobby's
Dot painting, schilderen op nummer en diamond painting
Alle drie de hobby's laten een beeld stap voor stap ontstaan, maar het proces voelt anders. Dot painting is de eenvoudigste en schoonste: geen verfpotjes, geen losse steentjes en geen tekenvaardigheid nodig.
Zachtste start
Dot painting
Wat je doet
Je vult gedrukte cirkels met een dot-stift, stip voor stip.
Rommeligheid
Weinig rommel.
Moeilijkheid
Heel beginnersvriendelijk.
Het best voor
Rustige, precieze, schermvrije creatieve tijd.
Schilderen op nummer
Wat je doet
Je vult genummerde vlakken met verf.
Rommeligheid
Matige rommel.
Moeilijkheid
Beginnersvriendelijk, maar vraagt droogtijd en penseelcontrole.
Het best voor
Mensen die graag met penselen schilderen.
Diamond painting
Wat je doet
Je plaatst kleine harssteentjes op een plakkend, gecodeerd canvas.
Rommeligheid
Weinig tot matige rommel.
Moeilijkheid
Beginnersvriendelijk, maar met veel kleine stukjes.
Het best voor
Mensen die houden van glitter, sorteren en detailwerk.
Wil je iets rustigs, schoons en makkelijks om mee te beginnen, dan is dot painting meestal de zachtste eerste keuze.
Vragen
Veelgestelde vragen
Korte, duidelijke antwoorden op de vragen die beginners het meest stellen.
Wat is dot painting?
Dot painting is een creatief kunstpakket. Je canvas is bedrukt met kleine, lichte cirkels die je met de hand invult in één kleur naar keuze. Van dichtbij zie je stippen, op afstand een afgewerkt beeld.
Is dot painting goed voor beginners?
Ja. Geen tekenen en geen kleuren mengen. Het beeld staat al op het canvas, je vult gewoon elke cirkel. Een van de rustigste manieren om te starten.
Moet ik kunnen tekenen?
Helemaal niet. Elke cirkel is voorgedrukt. Dot painting draait om vullen, niet tekenen, dus ervaring is niet nodig.
Wat zit er in een Paint By Dots kit?
Een voorbedrukt canvas, dot-stiften, een gedrukte preview en een QR-code die de instructies online opent. Alles wat je nodig hebt, zit erbij.
Wat is het verschil met schilderen op nummer?
Beide maken van een beeld iets om zelf af te maken. Bij schilderen op nummer penseel je meerdere kleuren in genummerde vlakken. Hier zijn er geen codes; je vult cirkels met één stift.
Wat is het verschil met diamond painting?
Diamond painting plaatst kleine steentjes op een kleefcanvas. Dot painting vult gedrukte cirkels met inkt, dus niets plakken en niets los.
Welke stiftpunt moet ik gebruiken?
Gebruik de dikke punt voor grote cirkels en de fijne voor kleine detailcirkels. De juiste punt houdt elke stip strak.
Wat doe ik bij een foutje?
Veeg snel met een vochtig wattenstaafje voor het droogt, laat drogen en ga door. Kleine oneffenheden vallen weg in het beeld.
Hoe lang duurt een kit?
Een kleine kit duurt meestal twee tot vier uur, grotere of gedetailleerde langer. Dit zijn schattingen; velen verdelen het werk over meerdere avonden.
Welk ontwerp kies ik eerst?
Voor een eerste kit zijn dieren, bloemen, sterke grafiek en eenvoudig abstract het makkelijkst, met grote vlakken. Bewaar gedetailleerde portretten en landschappen voor later.
Kan ik mijn eigen foto gebruiken?
Ja. Upload een foto, wij bekijken die met de hand en zetten hem om in een canvas om in te vullen. Jij maakt het werk zelf, stip voor stip.
Kan ik het afgewerkte werk inlijsten?
Ja. Laat het canvas goed drogen, lijst het dan in, zet het op een plank of hang het op. Het is gemaakt om te tonen.